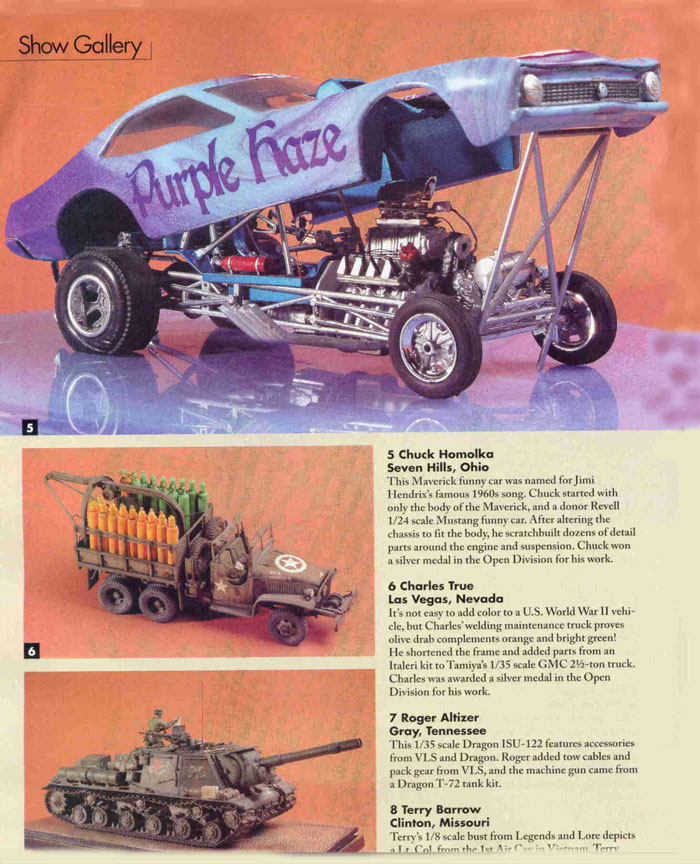
Chuck Homolka's Aoshima Interceptor
This Aoshima kit is made by Chuck Homolka; a modeler in Ohio. He belongs to the North Coast Automotive Modelers and IPMS.
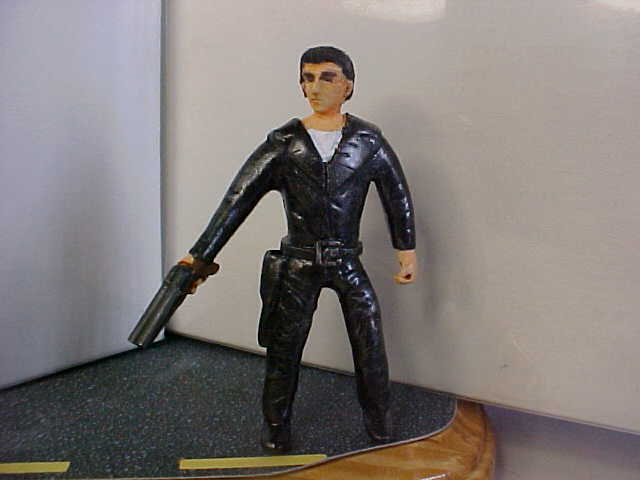
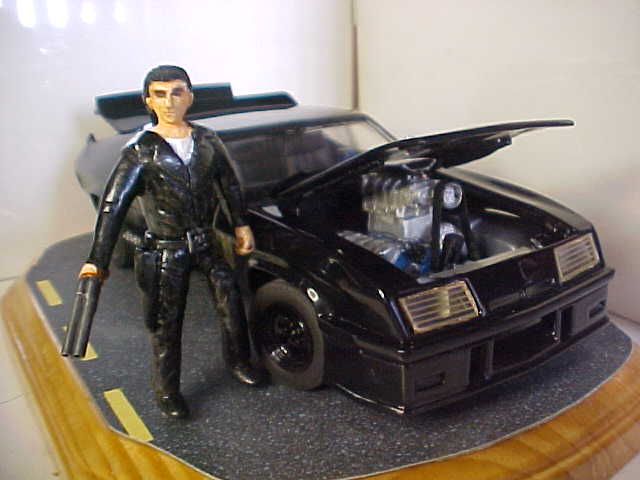
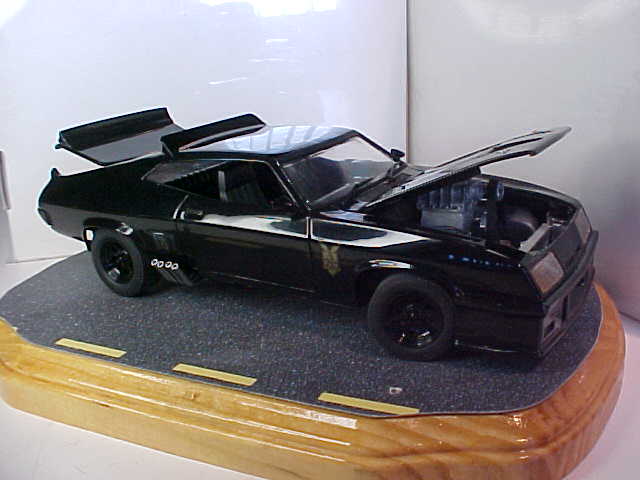
Here is Chuck Homolka's modified Aoshima Interceptor. He used the conversion kit, the kit-man productionz Max figure, and several other modifications to make the car appear as it did in Mad Max. Chuck has also written a very detailed and informative narration on how he did it. Here is what he had to say:
Mad Max Interceptor
By: Chuck Homolka
As model builders, we are a pretty diverse bunch of people. We get our inspiration for our projects from a sundry of different places. Movies have always been a favorite area where one can grab inspiration and turn out a replica of a favorite vehicle. I enjoyed the Road Warrior movies and bought resin kits of the high performance cars I saw as they became available. In 2004 Aoshima made the first plastic kit of the Interceptor; this being the black law enforcement machine driven by Max. This kit was only sold in Japan for a short time. It could be bought as a normal kit or the special edition that came with a cast metal blower and scoop. In time it drew so much interest that Scale Auto named it one of the top ten kits for 2004.
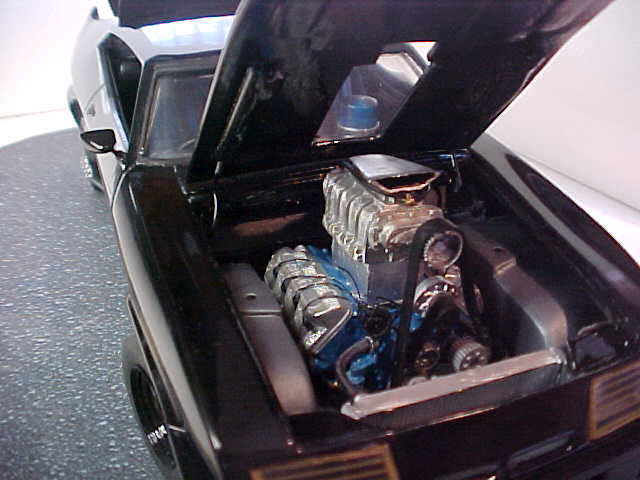
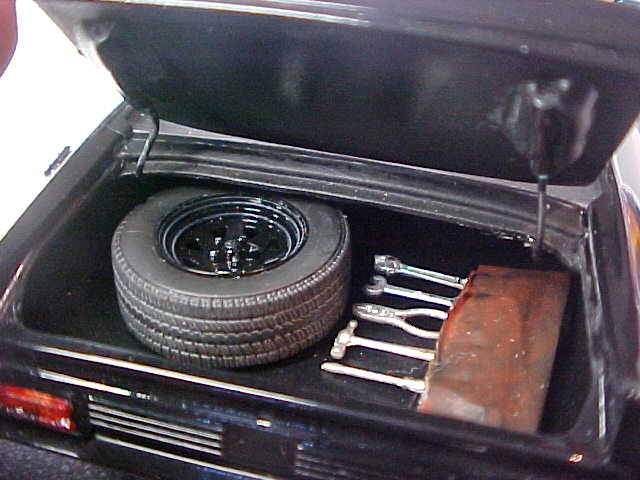
I feel lucky that I hooked my special edition on e-bay and was able to have a great start for my project. 'Project?' you may ask. I now had a complete kit of the Interceptor from the second movie but I wanted to build the first movie car. Well as luck would have it I was searching on the Internet when I found the resin conversion set that backdated the Interceptor. This really helped since you get the front spoiler, truck lid, trunk spoiler, rear package shelf, the top of the rear seat, and a passenger bucket seat. These pieces were cast quite well with no extra work required besides the regular washing and primering. As I looked over the Aoshima kit it was evident to me that the best way to show off this car was make a change from the curb-side build that was given in the box to a full detail build. This was started with the careful cutting of the hood from the body. With this done I used evergreen plastic and glued it around the inside of the new hood opening so that the hood would have a correct lip to lie on when it was closed. At this point hood hinges were constructed from fine wire and evergreen so that I could open and close it. Since I was in the hinge-making mood I decided to make one for the trunk also. This was a little more difficult since the evergreen hinge piece attaches to the rear package shelf that was not to be installed permanently until after the car had been painted. So during the construction of the hinge I just held it into place with masking tape; and after the basic construction was finished the piece was removed. A coat of primer was applied and block sanded before I worked on my rear spoiler body pieces. As mentioned earlier the conversion set came with a rear spoiler that mounts to the truck lid. The kit's body has the tapered spoiler end pieces molded into the rear section of the Interceptor. The problem is these two pieces are different sizes so they do not line up correctly. I built up the body spoiler pieces to size with plastricstruct angle and evercoat body filler. With the filler carefully sanded smooth the spoiler ends met the rear spoiler correctly. With a couple coats of primer they look molded in. When dry the body was ready for paint. It came to work with me and was painted with industrial black lacquer that is use on our units. The body parts turned out quite well and were put aside to dry. It was now time to modify the floor pan. The kit piece has a lot of details molded in including the bottom of an engine and drive shaft. The best action to remove the drive shaft is take your motor tool and grind along the seam on the inside of the floor pan. This does a couple things, first the part is removed without any extra plastic from the body being removed and second there was no chance in damaging the underside detail if the motor tool would slip. The long top of the transmission tunnel was then closed up with a strip of evergreen plastic and Tenex glue. It turned out so well it was hard to tell were the drive shaft was removed. The harder part came next with the removal of the molded in engine. I carefully worked with the motor tool to remove the unwanted plastic but still retain the crossmembers that were present. When working on this piece from both sides it is imperative due to the need to remove a lot of plastic from what will become your engine compartment. After this messy task was done I dove into my parts box to get a power plant that would be appropriate for an Interceptor. I knew that Max.’s car was an Australian Ford and for all the photos taken of it in the movie the only part that is always visible is the blower and scoop. For the high performance look I took a 429 to fill the bill. Necessary parts to build now were the engine mounts. These were built from evergreen plastic and fastened to the side of the frame rails so the engine can sit squarely in them. The finished parts look great but as I look at the finished car you can barley see them with everything else in the engine compartment. Oh well. The engine sports the chrome type valve covers that came with this engine and these were made more realistic by giving them a shot of dull coat. These covers are so well detailed that they have molded in plugs making attaching a spark plug boot to them very easy. I used a Replica & Miniatures of Maryland distributor with Detail Masters wire and stripped electric wiring for the boots. As I said earlier the blower came in my kit as a cast metal piece and all that was needed was use a motor tool with a fine brush to clean it up and a parts box blower manifold on the engine for it to sit on. With this mock-up in place I sat the body over the chassis to check on alignment. Guess what? The blower barley stuck out of the hood. Well it was kind of puzzling to me since the engine was the correct scale and was sitting properly, so why the big difference? Since not is all that it seems on Hollywood cars a little artistic license was needed. I built an intake box under the blower from evergreen (I had seen these on 1:1 cars) raising the whole assembly up so now the blower sat were it could be seen. Next was the installation of a blower belt system. The kit comes with a plastic piece for the curbside look, which was tossed aside for Perry Resins ribbed rubber blower belt and resin pulleys. These parts are finely cast and fit A1 making the engine look like it could start up. Since I had gone this far I looked closely at my references and ran the appropriate scale fuel lines for the engine. With the engine looking good it was necessary to come up with a radiator for it. My favorite way to do this job is make it myself. I have kept an article close by from Scale Auto Magazine showing the basics of constructing a radiator from evergreen siding. This plastic is sold in packages at your local hobby store and allows a realistic finish for your part. The end tanks are half round plastic cut to the right length. Glued together and mounted you would be hard pressed to tell that it was not a kit piece. A parts box dual electric fan was then mounted to keep everything cool. It was time now for some interior work and I started by panting the seats and door panels a semi-gloss black. I followed this up with the dash getting a coat of trim black so that it would be set off from the surrounding area. Following the references that I had the rest of the parts were painted appropriately. I did add some finer details in the Interceptor like the blue flasher unit, which is mounted on an evergreen bracket to the correct location on the dash, and some seat belts. I did not want these items to be difficult to see so I cut the kits supplied windshield and side windows apart and glued only the windshield in place. This gave the car a look like the side windows were rolled down. Since the kit does not have a rear window I looked in to my parts and came up with a stock car glass that had the correct dimensions and only required a bit of trimming to fit properly. Now that the interior was done I finished the undercarriage off. I used the supplied exhaust but ran hot water over the plastic part so that it would conform to the new exhaust headers that I had mated to the engine. There is a nice supplied front and rear suspension with brakes that only needed a little painting and if careful will allow you to pose the front tires in the desired direction. I found out that when the front suspension pieces went into place they would not sit in the right location do to the engine oil pan being in the way. This was cured by cutting the center cross member away from the side pieces, rotating it and regluing it so now it was sitting on its side and missing the oil pan. I now put the Interceptor interior, body, and chassis together making it whole and close to completion. With these parts together it was apparent that the headlight buckets required a top finishing piece so they looked complete when the cars hood was raised. These were cut from Evergreen sheet, painted, and glued into place. While the plastic sheet was out it was also necessary to cut a piece and paint it for the firewall. This is so that the firewall goes all the way up to the bottom of the windshield and does not leave a gap, because the kit never was intended to have its hood open and show this type of detail. While working on the front of the Interceptor I noticed that the front spoiler needed light lenses added to the supplied cutouts. These were found in my part box and glued into place. The trunk did get a few details added like a spare tire and some tools in a case. The only other item added at this time was a gas door taken from the ’65 GT-350R kit. This helps give the kits molded in gas door some depth and detail.
Well the Interceptor is done and looking good. Now all I need is a little more time and I will get started with its sister car that I have.


Some of Chuck's excellent work has been choosen to appear in upcoming modeler magazines. Here are some pictures of his featured work.